Here are the 2 patterns that you will need ...
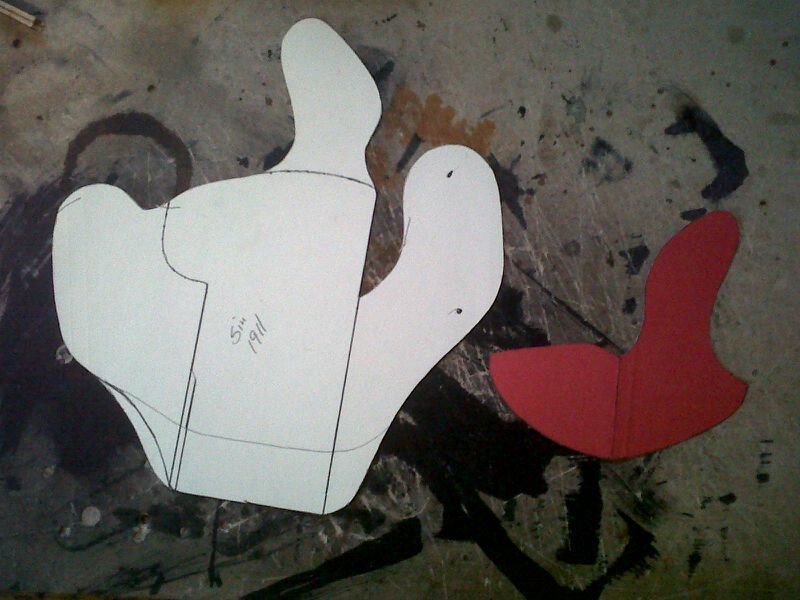
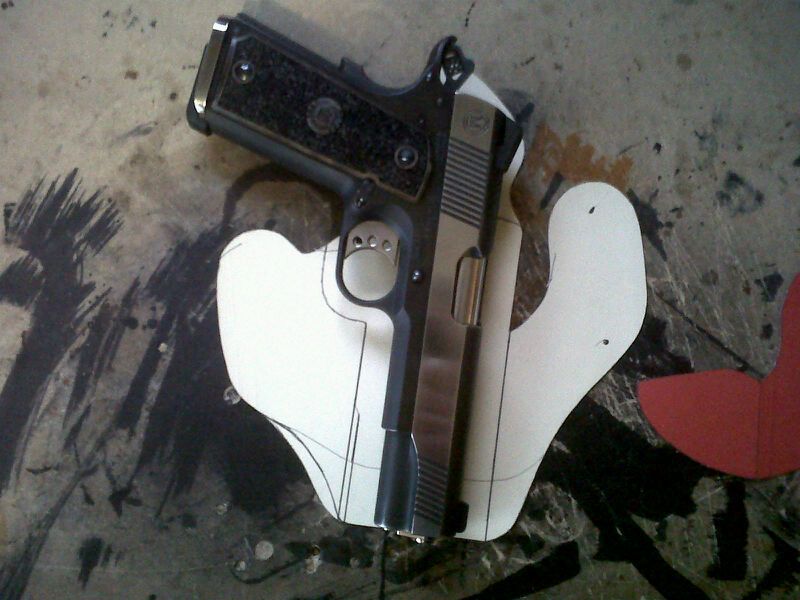
heres a picture of the pattern with the gun on top of it...
Now when I build most of my iwb's , they are rough side out on the back . That helps keep the holster from moving around and feel better against the skin once its broke in . With that in mind these patterns can be used however you wish , It will come out with the same holster in the end . This might be a little hard to follow since I dont have any pictures to post along with the tutorial . Im in the process of building other things at the moment so bear with the best you can . Also feel free to make any corrections in any of the steps listed below. Here we go.....
1 If you look at the main pattern you will see a line that runs along the top just below the sweatguard . Line is the mouth opening of the holster , or the front side. When you trace these patterns keep that line in mind. When your tracing for the backside of the holster go ahead and run the entire pattern onto the leather . When you trace for the front side , stop where the lines are at and use an awl or even a pen and make little dimple through the pattern onto the leather . Pull the pattern off and connect the dots . Then draw the reinforcement pattern out . Go ahead and cut everything out . Pay careful attention that you stay on pattern as much as possible . If you dont you will be able to tell when you are ready to glue everything together .
2 This is very important here . Scribe your glue lines and stitching lines right now while everything is flat . If you forget to do this you will have a hell of a time once everything is glued together .
3 Take the reinforcement piece and use a sanding drum or dremel and even up the edges . Mostly to the bottom side , thats the part that cant be touched once its glued on . After sanding , go ahead and bevel the edges . Heres another important step that will make the holster really look nice . After the beveling is done , figure out what color your going to make it and burnish the bottom sides with that color .
4 Now your ready to start gluing it together . Start with the backside first . Try to get it as even as possible cause if not it will affect how it will sit on the front of the holster . This is where patience comes in . Your about to stress the leather a bit so you have to make sure the glue is pretty much dry and stuck or it will move on you .
5 Now take the backside of the holster , the part you just glued the reinforcement to , and move the front wing of the holster out and around the the other part of the reinforcement . Go ahead and glue the front piece on next . You should make sure that the leather is butted up to each other as close as possible , it will affect how sturdy the mouth will be . Give it some good drying time . Now take the other piece of the front wing and move it around back just like the other if you havent already . You should start to see the holster coming around now and have a general idea of how its going to go from here .
6 Go ahead and sand the top edges even and bevel those while the holster is open and still easier to work with . You can also burnish the top right now if you like but it can also be done later .
7 Time to stitch the mouth of the holster . This can be a bit of a challenge . Start on the front side of the holster on the very top and stitch going towards the sweatguard . Once you get to the part where you have to run real close to the front wings you have to be very careful that the machine doesnt get rough with it .
8 Take a little bit of water and put it on both sides of the reinforced area and go ahead and make your bend to close the holster on up .
9 Remember those glue lines I told you not to forget , imagine trying to add them to the holster right now .
10 Time to glue the front and backs together , Make sure to line up the edges as good as you can . Even if you have to bend the leather a bit it wont hurt anything .
11 After the glue is dry go ahead and sand the edges even . Be careful around the front wing between it and the reinforced side.
12 bevel all the edges down and lay out your outside stitching lines . Throw it in the stitcher and go ahead and do all the stitching
13 Now you can do your wet forming . I normally used hot tap water and just run the holster under it for a few seconds then set it aside for about 3 to 5 minutes to allow it to case
14 Insert the pistol and start boning all the lines in . Dont forget the back side to .
15 Set aside to dry for atleast 8-12 hours depending on humidity and heat .
16 There are several ways to dye the leather . I either dip or airbrush . Now is the time to do that and make sure you coat it inside as well .
17 Let it dry again for 8-12 hours .
18 Oil with neatsfoot oil thoroughly . Dont allow the leather to get to dry while working it .
19 Go ahead and get all the edges finished up on it . I use water to start then switch to beeswax for a nice gloss shine . My burnisher is just a standard wooden dowel with several slots cut into it mounted in a drill press
20 Once all that is done you can apply the sealer on the inside . I use aussie leather conditioner to lay all the fibers down . Once thats dry I then spay a mopnglo solution over the entire holster inside and out. Let it sit and dry for atleast 3-4 hours then check the finish . Add another coat if like .
21 While you waiting for things to dry you can make the loops . Try to remember to get the belt size from your customers when they order cause it will make a difference on loops size . Make sure that before you make a bend to them to actually make your loop that you get the leather a little wet .
22 Check the finish on the holster and if your happy with it then go ahead and use some natural show polish and polish it up . Be gentle you dont have to hit it like a car . Make sure your rags are clean and soft as well . I use microfiber towels.
23 Punch your holes and attach your loops , Wipe everything down again and check firearm fitment . If its to tight wrap the pistol in a plastic bag or wax paper and insert it into the holster and let sit overnight in a warm dry place .
24 Everything should be loose and pretty much ready to use . One thing that I do before I let any one of them go is to give it a good buffing with sheeps wool . that will get the excess stuff off and will catch any bleed off .
This is what you should come out with ....

Well there you have it . Im sure everyone does things differently , but I hope this in someway helps out.


 MBTV
MBTV Forum Index
 Help
Help Calendar
 Contact Info
 Register as a member
